32.2
Findings
In total four suspect areas possibly damaged by explosions were identified, viz.:
(1) the upper void space behind the starboard front bulkhead
(2) the lower void space behind the starboard front bulkhead
(3) the lower void space behind the port front bulkhead
(4) the bow ramp.
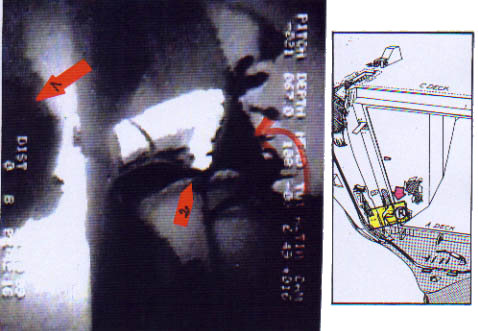
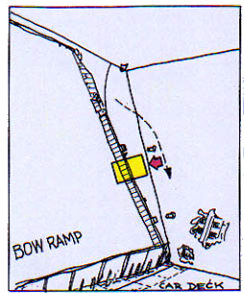
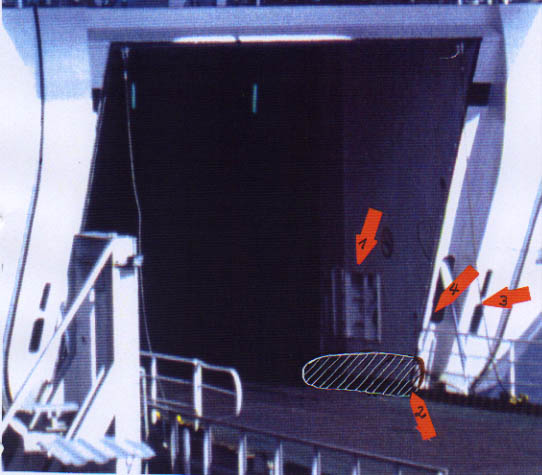
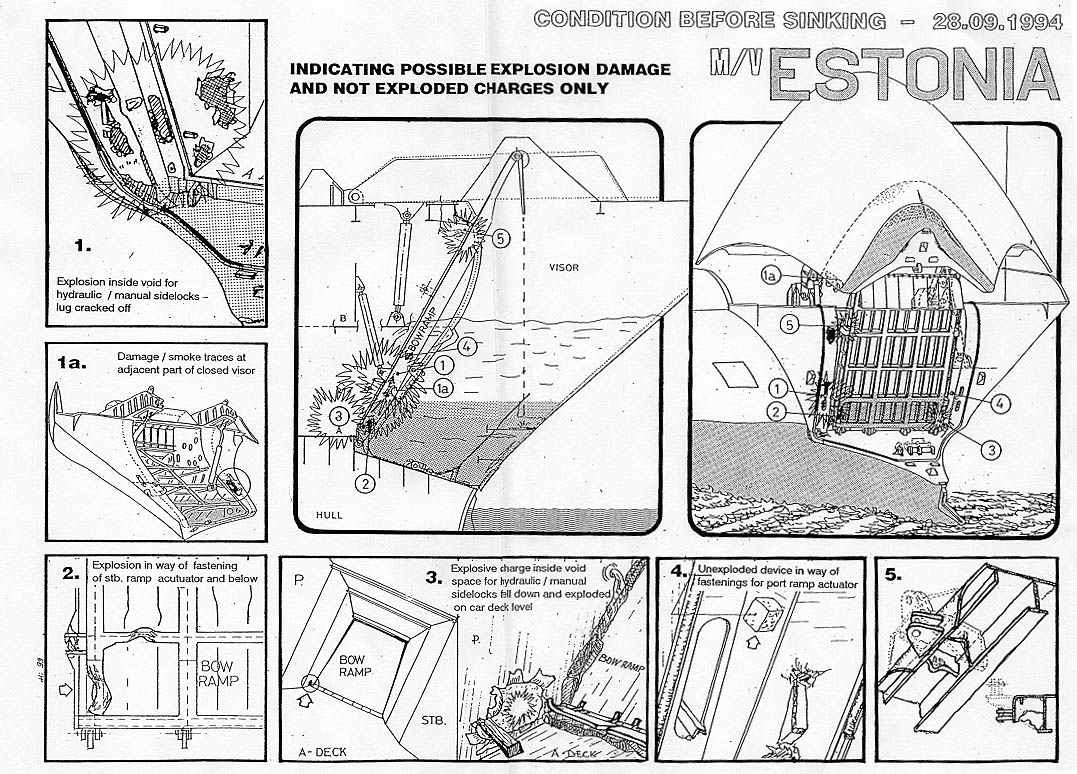
The Starboard Front Bulkhead - See also Subchapter 29.2 - where most of the possible explosion damage was identified, is explained by the drawing following.
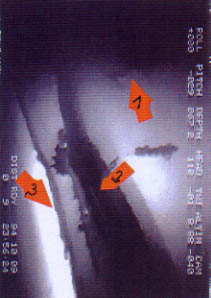
Arrow 1 points to a big steel piece sticking in the deck opening.
Arrow 2 points to the torn open part of the upper bulkhead.
Arrow 3 points to a hole above the lug of the side lock and to the enlarged opening for the manual side lock.
Arrow 4 points to the cracked off/distorted lower part of the bulkhead.
Arrow 5 points to the enlarged/cracked opening for the starboard ramp actuator.
Arrow 6 points to holes in the starboard longitudinal bulkhead inside the car deck.
Behind the front bulkhead there is an upper and a lower void space located. In the upper one - actually the B-deck - the visor actuator and the ramp hook arrangement was fitted. The part of the bow ramp with the mating lug for the ramp hook was extending into the void space as can be seen on the picture below. The arrow points to the ramp hook.
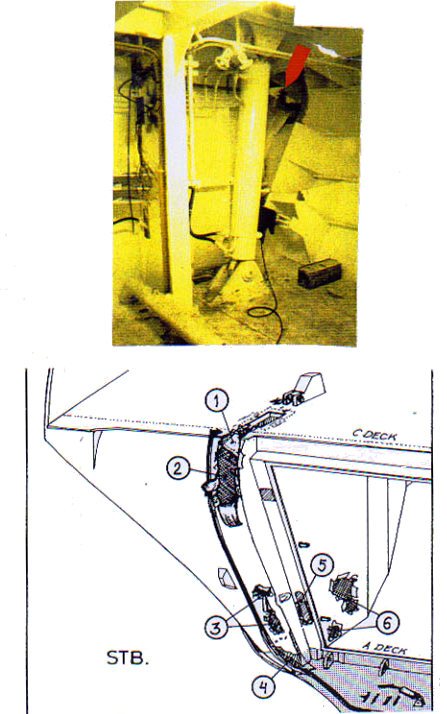
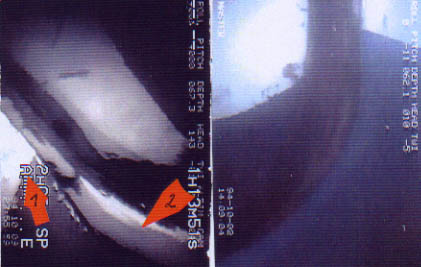
The lower void space - on A-deck - car deck level - was located directly below the upper one - on B-deck - and contained the hydraulic and manual side lock arrangements as can be seen on the picture below which is explained by 6 arrows. The visor is closed.
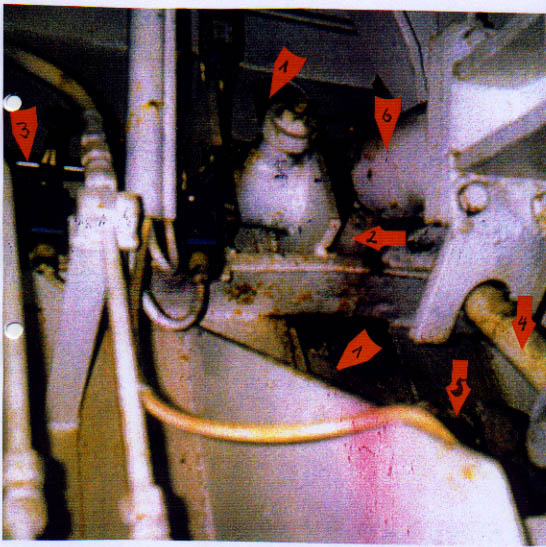
arrow 1 = opening in front bulkhead with visor plating behind through which the lug of the hydraulic side lock was extending
arrow 2 = lug of hydraulic side lock
arrow3 = cylinder and piston rod of hydraulic side lock
arrow 4 = hinged eyebolt with nut of manual side lock
arrow 5 = 2 hooks of manual side lock
arrow 6 = ice cylinder
arrow 7 = opening for hooks of the manual side lock with visor plating behind.
as to (1):
The upper void
space behind the starboard front bulkhead shows considerable damage to the
bulkhead plating with the plating bent from inside to outside and frequently
cracked. This had obviously been possible because the upper part of the visor
moved forward after the starboard hinges and side lock had failed and never
contacted the front bulkhead again, because at the lower end of the blown
open plating a big steel part is extending almost horizontally which otherwise
would have been pressed back. The same refers to the steel tongue extending
from the visor plating in way which was also not pressed against the bulkhead.
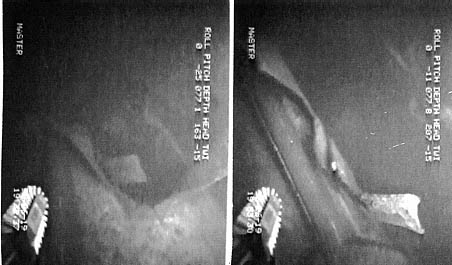
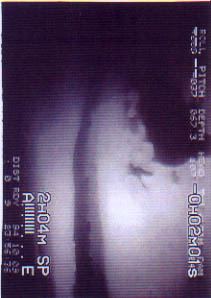
The image below on the left shows the lower part of the damaged upper front bulkhead looking from bottom to top. The image on the right shows the damage further up.
The following image shows the upper part of the same damage with the severely distorted and upwards bent mating lug for the starboard ramp hook.
as to (2):
The lower void space behind the starboard front bulkhead shows very considerable
damage in way of the openings for the lug and hooks of the hydraulic and manual
side locks but, in particular, further down the bulkhead was apparently completely
cracked off the forepeak deck and pushed upwards.
- The front bulkhead plating below the area of the hydraulic side lock was pushed outwards with excep-tion of the rubber packing - see image below. It is clearly visible that the rubber packings, normally extending beyond the bulkhead, are in some sort of fold indicating that the surrounding plating was deformed towards the outside.
- The next image shows the area further down the bulkhead. Arrow 1 points to the lower edge of the opening for the hook, arrow 2 to the rubber packing and arrow 3 to the deep, sharp fold to starboard of the rubber packing, which extends from forepeak deck level up to the side becoming narrower the further up it runs. It is obvious that the surrounding bulkhead plating was deformed towards the outside of both sides of this fold and also between the rubber packing and the inner bulkhead edge.
- Further down the front bulkhead in the so-called "corner of the mouth", the area to the outside of the rubber packing is cracked open over some 300 mm - see left image below. The bottom part of the front bulkhead is severely deformed and apparently cracked off the forepeak deck as well as cracked off the inner bulkhead plating and probably also off the outer shell plating as can be seen from the left image below.
In explanation of the left image the following has to be noted:
arrow 1 = change over from blue to white paint. On the image below the arrow points to the respective area on the opposite port side.
arrow 2 = points to the torn off and dislocated lower parts of the front bulkhead. The right image shows the corresponding intact port side.
Note: As the visor was resting against this area when a possible explosion occurred, the bulkhead could not burst open to forward and the pressure obviously escaped downwards and to the sides. Thereby the complete lower part of the front bulkhead was torn off the recess on the inside, off the shell plating on the outside and off the fore-peak deck on the lower side. Actually the area indicated by arrow 2 should be blue as can be seen from the image beside it showing the respective port side.
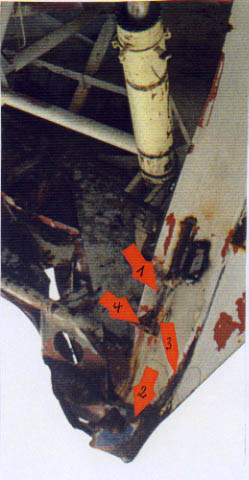
- Next to the cracked open inner bulkhead plating, the lower section of the starboard outer vertical girder of the bow ramp - being immediately next to the cracked plating when the ramp is closed. It is noted to be cracked off both from the upper and the lower transverse girder as well as from the bow ramp plating and extremely deformed and pushed to port. - See the image below with the explanatory drawing and also the extensive photo documentation in Subchapter 29.2.
- Slightly further up, the landing of the fastening of the starboard bow ramp actuator was noted to have been cracked open, severely deformed, with the fastenings of the actuator missing and the actuator broken twice. See the following image.
Arrow 1 points to the enlarged opening in the front bulkhead for the manual hook and arrow 2 points to the burst open landing to which the starboard bow ramp actuator had been attached.
Due to the extent of this damage it has to be assumed that additional areas were affected, e.g. the bottom part of this and the adjacent void spaces, and the bulkhead towards the car deck. The appearance of the corresponding parts of the starboard lower aft bulkhead of the visor do confirm that the damage existing in way of the lower starboard front bulkhead of the vessel and the adjacent area was most probably caused by the same occurrence, viz.:
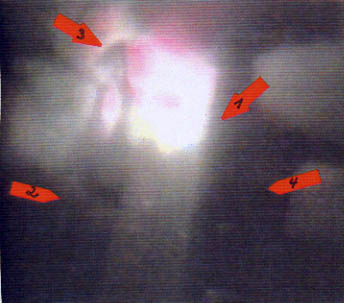
- the area between the lug and the hook shows intense smoke marks and had obviously been exposed to heat (arrow 1).
- the bulkhead plating at the change-over from white to blue and deeper is cracked at least twice with the plating severely distorted and plating parts torn out (which exclu-des pounding) - (arrow 2).
- a deep fold in way of the contact area with the flatbars housing the rubber packing of the vessel runs up the aft bulkhead from visor bottom to the hooks (arrow 3).
- the way the two hooks were crushed together (arrow 4).
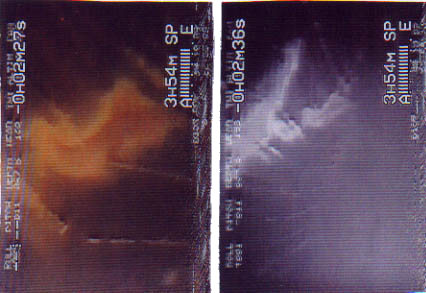
The two pictures below were taken from page 168 of the JAIC Report. The left picture shows the port aft bulkhead of the visor and the right one the starboard one, both in way of the initial location of the lugs for the hydraulic side locks. See also Chapter 30.
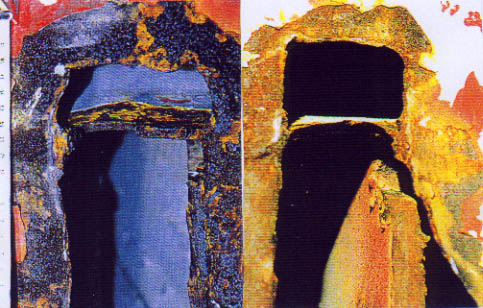
It is most likely that the starboard side had been exposed to considerable heat which is indicated by the corroded surface as a result of the changed metal structure. It is also most likely that the starboard side had been exposed to pressure from inside to outside which is indicated by the distortions and the cracked off stiffener, indicating a possible explosion in way. - See also Subchapter 37.7.
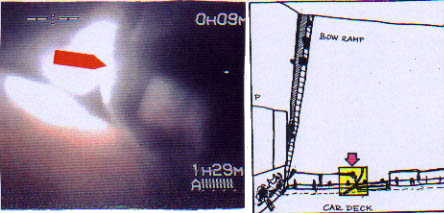
As more damage had to be expected to the bulkheads surrounding the forward void space on starboard side between A-deck (car deck) and B-deck, the available video footage was again analysed and the following was found: While the diver walked up (down) the starboard inside of the bow ramp and adjacent bulkhead plating from the opening at forecastle deck level to the hinges respectively lower flaps of the bow ramp, then along the flaps to the port side and up the port side of the ramp to the port opening, he was instructed only to look for the securing bolts and mating boxes of the bow ramp and that was exactly what he did, thereby ignoring completely most relevant damage areas. Unfortunately the quality of the footage is very poor and thus the images are rather foggy. Nevertheless the important findings should be understandable to the reader the following explanations:
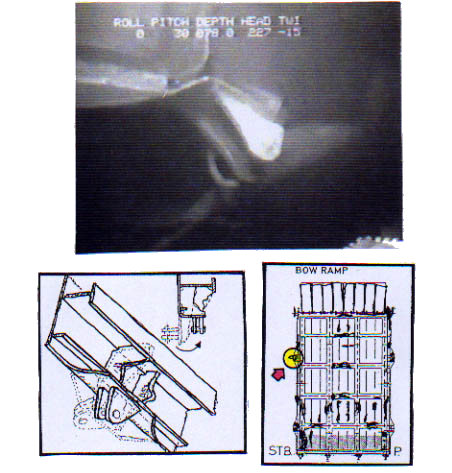
The image on below shows the area of the recess bulkhead between the lug for the preventer wire and the upper mating box. Arrow 1 points to the rubber packing of the bow ramp and arrow 2 points to the edge of the bow ramp. Between the arrows a metal flap is visible which is apparently part of the recess. Transferred to the front bulkhead around the corner this is the area of the big damage above the lug of the hydraulic lock. See also the above drawing.

The next image shows the black/yellow painted tire-protection bar edge of the bow ramp to the right with the remains, i.e. the inner part of the fastening, for the starboard ramp actuator - see arrow 1.
It is further visible that the edge of the ramp is bent up - arrow 2 - above the line of the recess bulkhead - see red dotted line.
This is the area where the broken piston rod of the actuator was seen from the outside to be jammed in between the ramp and the recess.
The next image shows the crushed lower mating box which was ignored by the diver. See arrow. This is most probably old damage, see Subchapter 29.2.
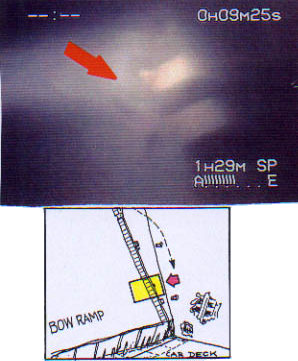
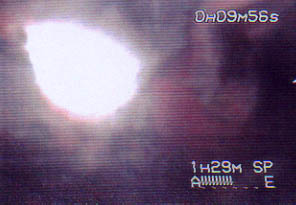
From about this position the diver looks to his left to the bulkhead of the void space with cracked open plating and pallets/other debris dropping out of the opening.
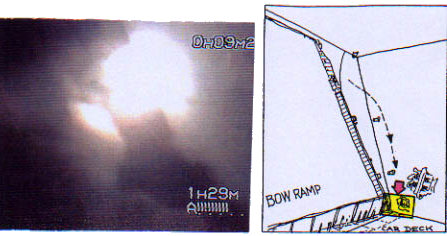
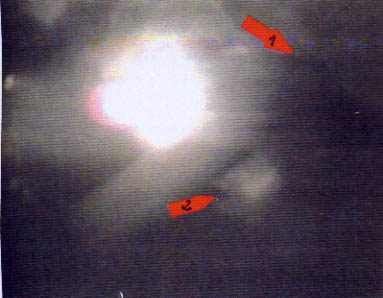
The diver looks directly into the big hole in the bulkhead and more debris becomes visible - see image below.

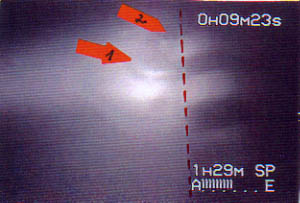
The diver looks down towards the lower flaps of the bow ramp and sees the first one on starboard side in raised condition - arrow 1 - and next to the flap he sees another hole in the bulkhead - see arrow 2.
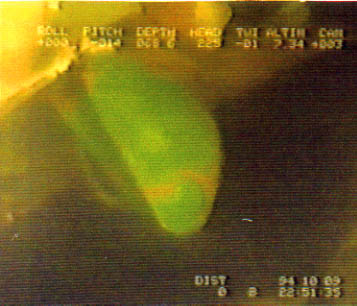
The eight flaps of the bow ramp covering the gap between the car deck and the open ramp were found to be in different condition: some were well painted, green and intact, while others - in the middle - were brownish/red and partly damaged. See the two images below.

The next image shows the second flap from port upright and the third one from port down and in between some rope or wire - see arrow.
The next image shows the first flap on the port side of the ramp - arrow 1, the lowest point of the raised black/yellow ramp edge - arrow 2, the vertical bulkhead into which the control panel was installed - arrow 3, and the damage area commencing in way of the car deck plating - arrow 4 - and extending into the vertical bulkhead below the control panel. This will be explained in the following item (3) - The Void Space Behind the Port Front Bulkhead.
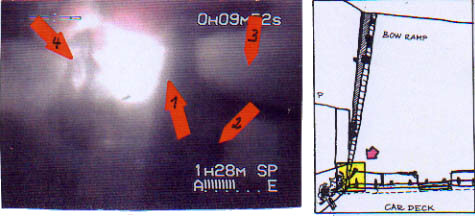
image as to (3): The Void Space Behind the Port Front Bulkhead.
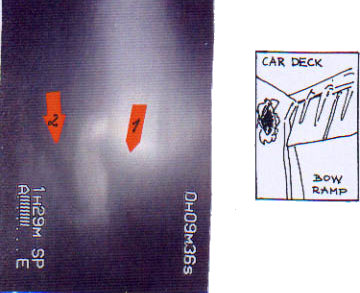
When the diver pulled himself up along the flaps on the car deck side of the ramp, he looked very briefly into the gap between the upright first flap from port - arrow 1 - and the car deck - arrow 2 - and the result was the image below which shows distorted car deck plating - arrow 3 - and something red in the background. Arrow 4 points to the bottom end of the port raised ramp behind of which the white vertical car deck bulkhead is visible.
Reference is also made to the drawing following this page showing the port side of the car deck opening without bow ramp.
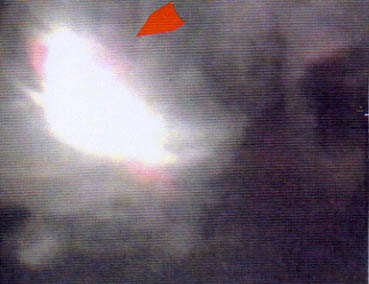
The diver looked further up - it becomes obvious that the damage from the car deck extends into a large hole in the vertical bulkhead as can be seen from the image below.

Arrow 1 points again to the first flap from port, arrow 2 shows the bottom end of the raised port ramp edge, behind which the white vertical car deck bulkhead is visible, out of which the metal is bent from inside to outside, i.e. from the void space into the car deck.
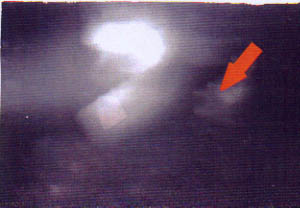
A close-up of the upper right side shows a bent and twisted beam sticking out of the hole. See the image below.
The diver looked to the left and the image below was made.
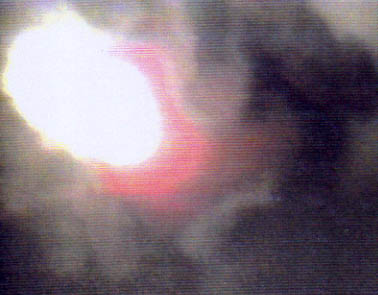
Apparently something red which could be bedding or mattress is sticking in the hole (behind this bulkhead was one of the two spaces where the boatswain stored second-hand mattresses, bedding and blankets as sealing material for the gap in the bow ramp).
The diver looked further to the left along the car deck bulkhead and more distortions became visible.
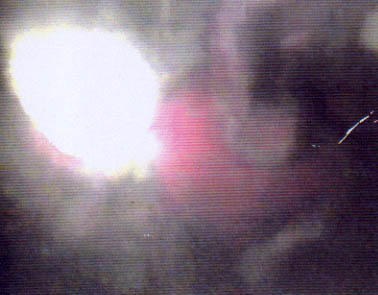
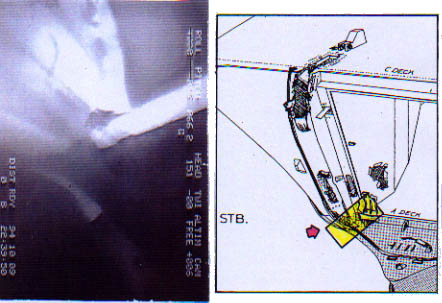
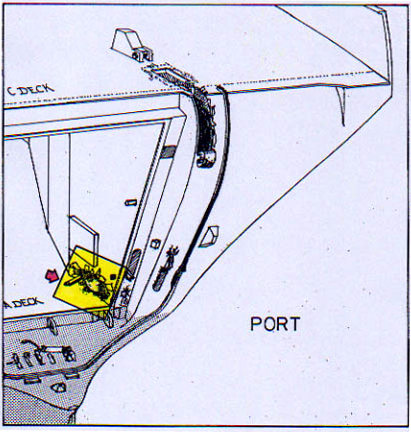
The diver continued to look further along the apparently torn open bulkhead with all sorts of things sticking out of it - see the image below apparently showing some rubber tire (used as fenders on the ferry) - arrow - together with other debris. This should be the area below the control panel as can be seen from the following image showing the entrance to the car deck with the open bow ramp.
arrow 1 = control panel
arrow 2 = bottom end of raised black/yellow ramp edge and first flap from port side
arrow 3 = openings for hydraulic and manual side locks
arrow 4 = opening for ramp actuator - the arrow points to the position of the actual fastening when the ramp was in closed condition.
The red hatched area indicates the damage, whereby the extent into the car deck is unknown because the diver looked only slightly further to the left as can be seen from the following image, which shows even more distortion with two apparently wooden planks sticking out of the torn up bulkhead edge - arrow 1 - and something like a stanchion with two guides or lugs at the top below the plank - see arrow 2.
The close-up below shows the situation somewhat clearer.
The diver suddenly turned his head abruptly to the right and headed for the port lower mating box and the securing bolt where he spent some 10-15 minutes. The large and spectacular damage explained above of an area which could not have been damaged in the course of the "heavy weather casualty scenario" was not examined by the divers, at least not on the publicly available video footage.
The drawing below is a part of the general arrangement plan of the vessel which shows the forward part of A-deck = car deck and the area directly below on tween deck = 1st deck. The red hatched area shows the damage area which can be seen on the images explained on the previous pages. The distance from the bow ramp - arrow 1 - to the corner of the bulkhead - arrow 2 - is about 4 m. Below the dotted line the bow thruster space begins, before that space the full forepeak was located.

Although it has to be assumed that also the fastening of the port ramp actuator was blown off when the ramp was in slightly open or closed condition, this cannot be documented by video images because this area was ignored by the diver.
as to (4): The
Bow Ramp.
The bow
ramp - see also Subchapter 29.2 - is damaged in various places to such an
extent that it cannot easily be explained, for example:
- The area in way of the 2nd transverse girder from the top (2nd girder below the upper flaps), which is crushed together over about 70% of the depth of the web with the dimensions 150 x 12 mm. See the images below.
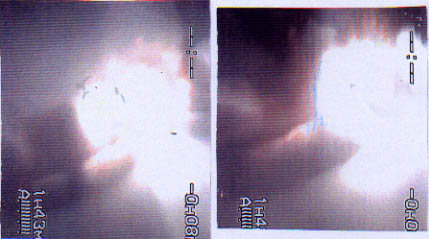
This very severe damage cannot have been caused by contact with any part of the vessel as long as the hinges were intact (at time of the diving survey the starboard outer and inner bow ramp hinges were still intact).
The respective inside of the bow ramp shows severe deformation and a burnt area in way. See the images below.
- The pushed up landing of the mating lug for the starboard ramp hook. See images below and on page 1106.

The landing with the apparently unaffected lug was pushed to starboard and upwards which has now also been verified by the expert Brian Braidwood and the results are confirmed in his "Supplementary Report" - see Subchapter 34.7.1. - Enclosure 34.7.1.435.1. In summary of the before explained items (1) to (4) it has to be assumed that the damages shown on the drawing behind the next page had been caused by explosion.
Final Comment
This 'Group of Experts' emphasizes that the video images and the other evidence
discussed in the foregoing are evidently based on the material in the possession
of the JAIC. However, the JAIC has nowhere in its report in any way commented
on this most disturbing evidence, including the presence of severe structural
damages to the hull.
(click for full page images)
There was no further evidence available at the time of closing this Report.
![]()